- Home
- Things to carve
- Clown carving
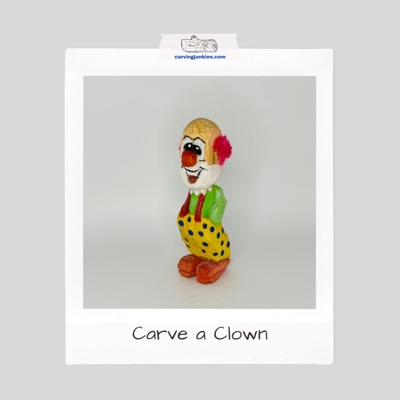
Circus clown carving tutorial
A super fun carve with an easy-to-follow template.
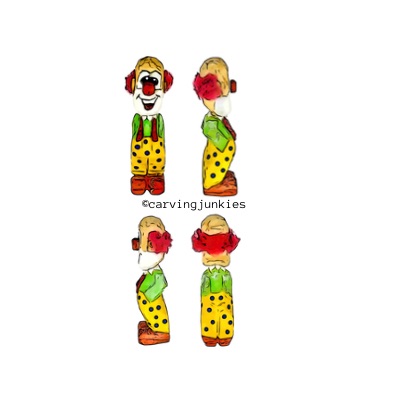
This circus clown carving tutorial is fabulous to carve and colorful to paint. We decided to create a cardboard template that is inspired by templates from carvers John Overby and Jack Price.
The pattern for our template is at the end of the page.
We ended up loving the stance of our clown carving and the template will lend itself to future caricature carvings. An advantage is that the template sets up the shoulders well.
What you will need for this wooden clown tutorial
You will need a block of wood for this clown tutorial. Our basswood block is 1 x 1 x 4-inches (2.5 x 2.5 x 10 cm). Want to go bigger? Simply double or triple the dimensions (and increase the size of your template).
You will also need a knife (or knives) of choice. We usually use a knife with a larger blade (up to 2 inches or 5 cm) to remove wood and a smaller detail knife for the face and for noodling details (like the ascot on our clown carving).
A pen or pencil, and a ruler, are good to have to draw your guidelines and sketch the design. We always recommend using carving gloves for safety. Remember to protect your lap, too.
For the hair (optional) you will need some cotton batting (or a few cotton balls) that are colored with red food dye and glued onto the clown carving after painting.
We list all the acrylic paints we use at the end of the page.
Clown carving tutorial at-a-glance
Trace your clown carving template
Print out the template at the bottom of this page and trace it on the right (photo 2) and left (photo 3) sides of your wood block. Tip: You only need to cut one version of the template and turn it over (making sure the head and body are pointed in the right direction on both sides). You may have to increase or decrease the size of the template, depending upon your block size.
Add some guidelines on the front and back (and extended them around the sides) so you can easily carve toward the middle of the sections where you will be making large V-cuts to remove wood (photos 1-4).
The first front guideline is a little under 1.75 inches (4.4 cm) from the top (photo 1), which marks the middle of the neck (photos 2,3).
The second front guideline is 3.5 inches (8.9 cm) from the top (photo 1), which marks the top of the clown’s shoes (photos 2,3).
On the back side (photo 4), the first guideline is 1.5 inches (3.8 cm) from the top, which marks the middle of the neck (it is a bit higher on the back because the chin on the clown carving is lower on the front).
The second back guideline is 2.25 (5.7 cm) inches from the top (photo 4), which marks the lower part of the clown’s arms (photos 2,3).
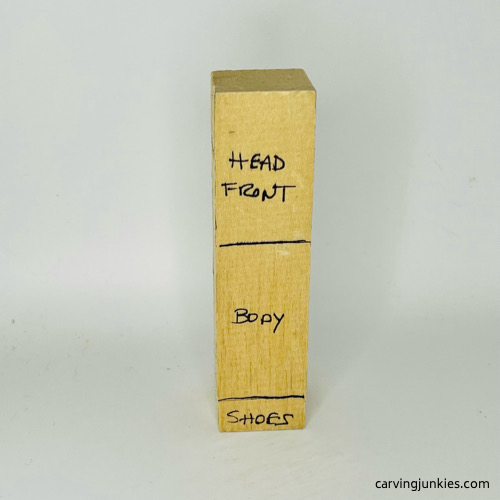 1. Guidelines are drawn on the front
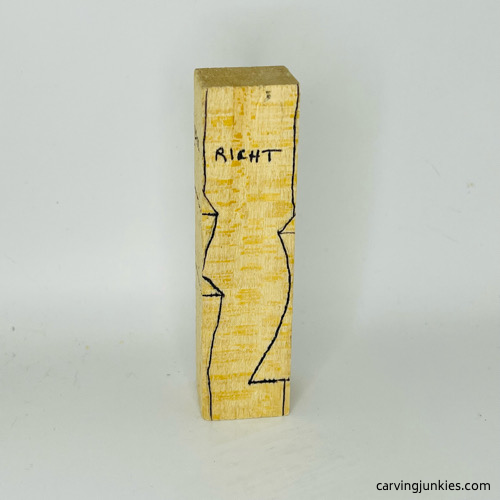 2. Right side with template guidelines
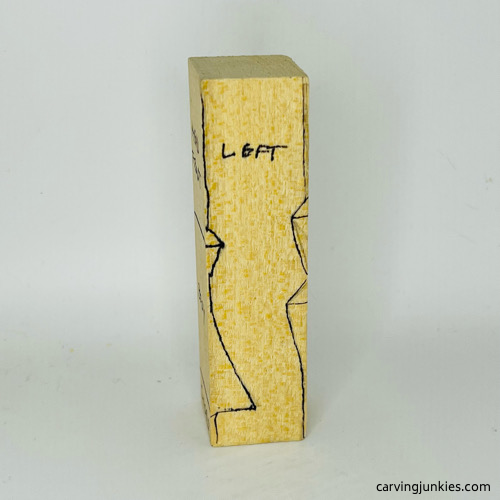 3. Left side with template guidelines
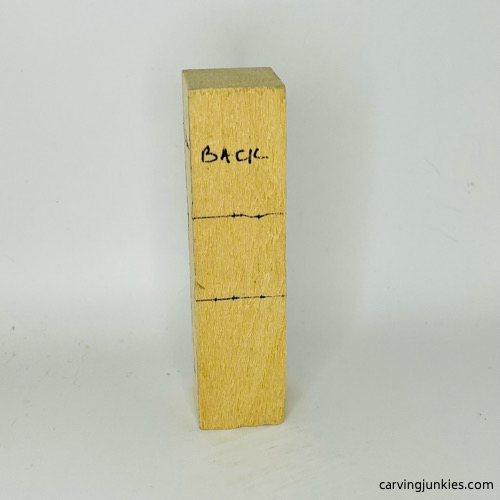 4. Back guidelines
Make your first cuts on the clown carving
First, roughout the clown carving by making a series of cuts to shape the body. Your first cut will be a wide V-cut on the front to separate the head (photo 5). Make your cuts meet at the middle point that you marked with your guideline.
The goal is to try to make one wide cut in each direction for a clean look that will be better for painting. However, if you don’t have enough strength in your hands, you may need to make several passes in each direction with your V-cuts. If this is the case for you, simply clean your cuts up as you go.
The next cut you make will be to separate the shoes. Make a stop cut (photo 6) and remove wood from above.
Continue to remove excess wood on the back of the clown. When your cuts are completed, your roughout should match photos 7 and 8.
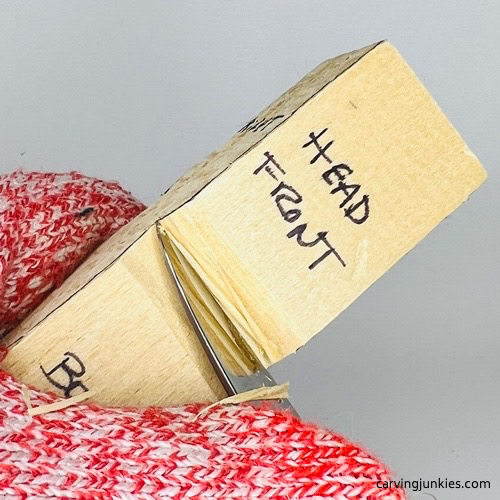 5. Making a wide V-cut
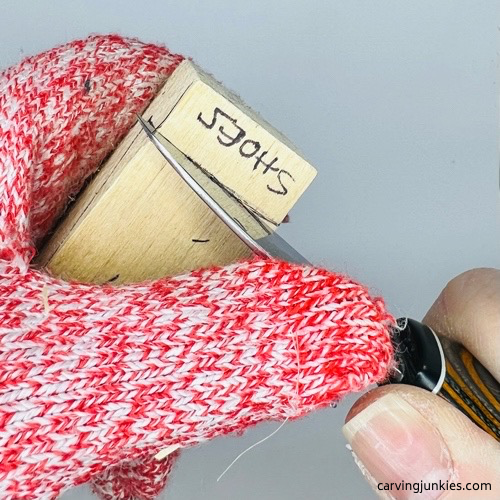 6. Making a stop cut
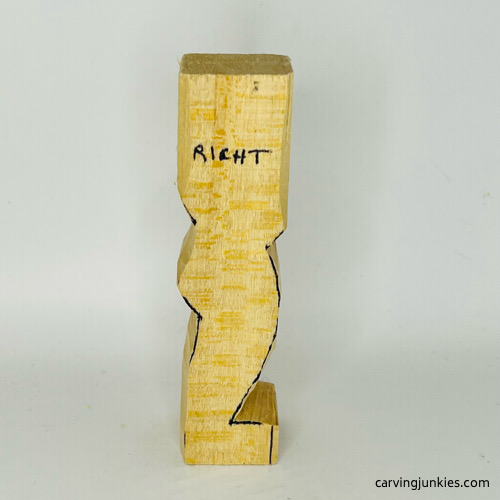 7. Right view of completed roughout
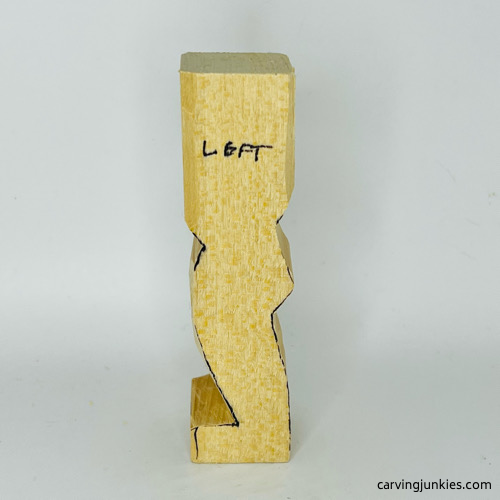 8. Left view of completed roughout
Draw some details on your clown carving
On the front of the clown carving, add a box to reserve wood for the nose, which is about 1/2-inch (1.3 cm) square (photo 1). It should be placed about 3/4 of an inch (1.9 cm) from the top.
On the right side of the clown carving, draw an ear box that starts about 1/2-inch (1.3 cm) from the top and is 1/2-inch (1.3 cm) square (photo 10). Draw on the arm, which will be tucked into the clown’s pants. The width of the arm is about 1/2-inch (1.3 cm). Also draw a guideline that you will carve to separate the head from the body (photo 10). Repeat these guidelines on the left side of the clown carving (photo 11).
Add a centerline on the back of the pants (photo 12), and a guideline to mark the bottom of the pants, which will be a little longer in the back.
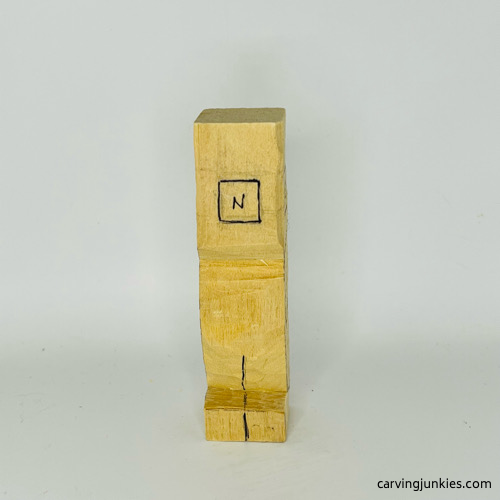 9. Nose box is dawn on the front
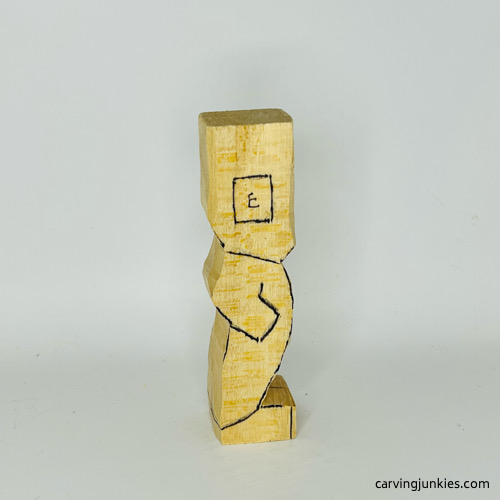 10. Right view of ear box, arm, and pants
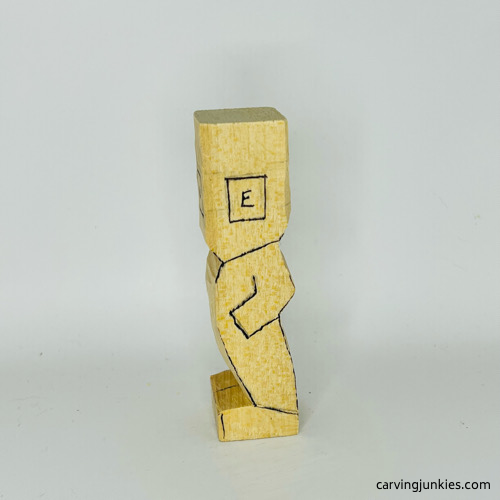 11. Left view of ear box, arm, and pants
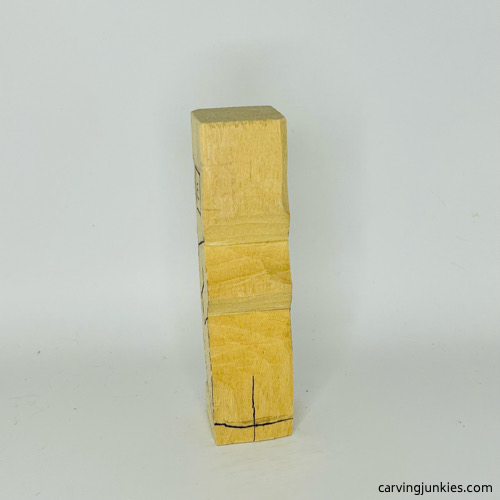 12. Pants and center line drawn on back
Carve the guidelines on your clown carving
Use a stop cut to separate the head from the body, removing wood from underneath (photo 13). Use a V-cut to split the feet (photo 14).
Turn the carving upside down and taper the shoes (tip: mark the wood you will remove first, as shown in photo 15).
On the top of the shoe, make an angular cut downward toward the clown’s body to remove wood (photo 16).
Also, add a guideline around the shoes that is a little less than a 1/4-inch (0.6 cm) from the bottom. This will mark where you will carve a rim around the shoes (visible in photos 15,16). Save carving the rim for last (to avoid breaking the shoes while you carve).
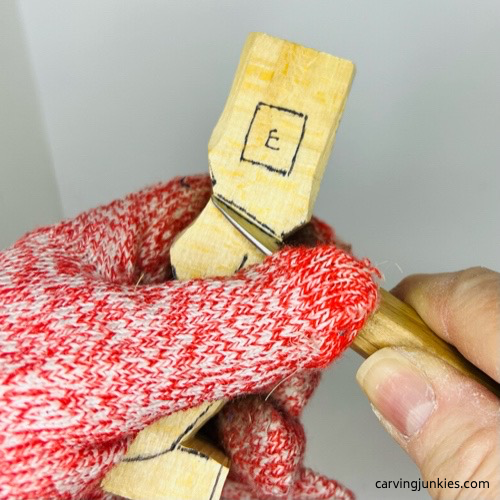 13. Separating the head
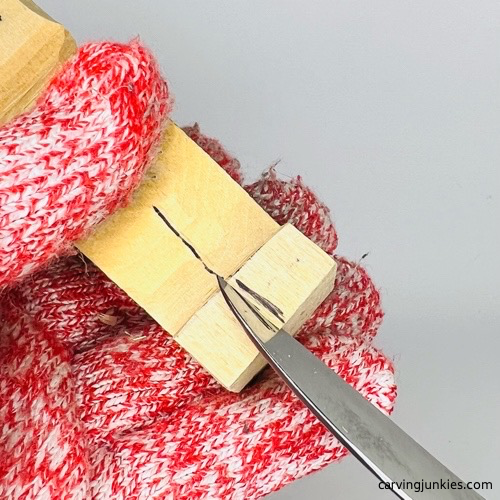 14. Splitting the feet
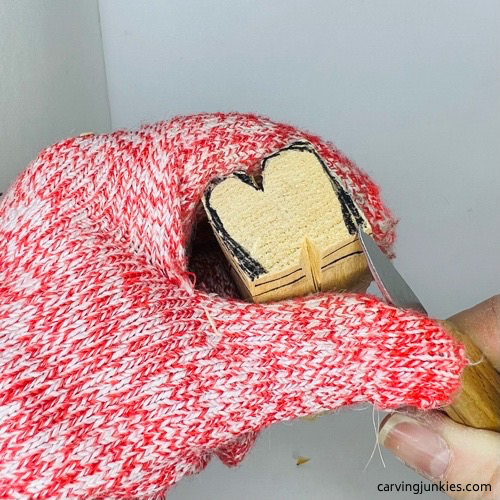 15. Shaping the shoes
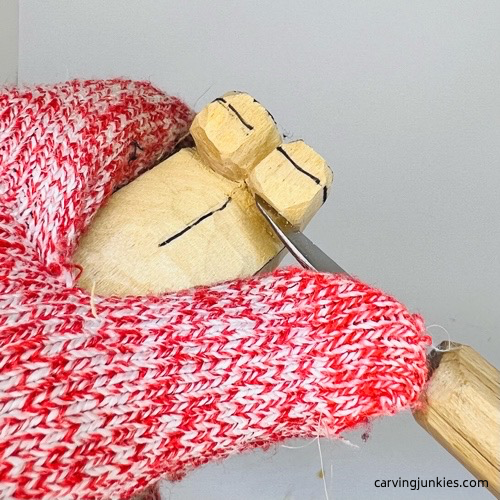 16. Cutting shoes back at an angle
Taper the legs and chest on the clown wood carving
Make a stop cut under each arm (photo 17). Then, use a push cut to narrow the wood on each side of the clown’s hips (photo 18).
Split the legs on the front and back of the clown carving (photo 19). Tip: Make a cut at a slight angle on one side (toward the middle), and another cut at an angle from the other side, to easily remove the wood slice.
Extend your cut between the legs on the back and create a little Y shape to mark the tush (visible in photo 20). You can use line cuts here (and add some wrinkles to the pants). Also, draw guidelines where you will separate the back of the arms (photo 20).
Remove wood to shape the front shoulders on the clown carving (photo 21).
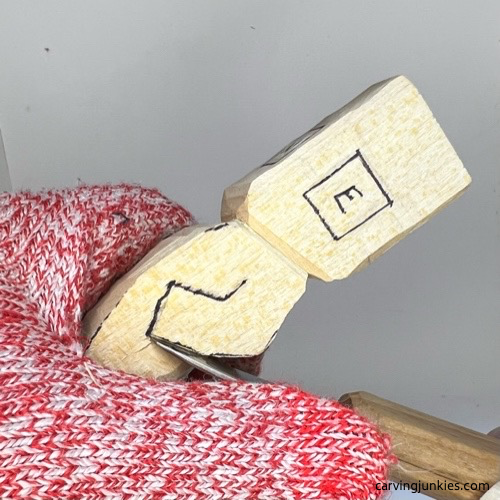 17. Separating the bottom of the arm
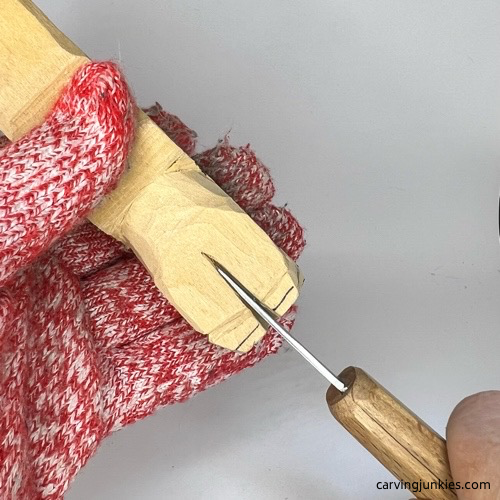 19. Splitting the legs
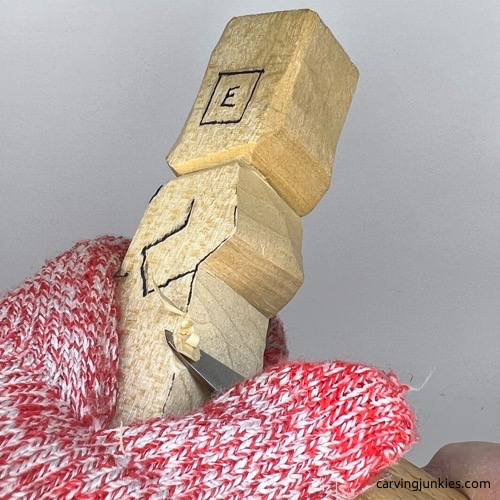 18. Tapering the legs with a push cut
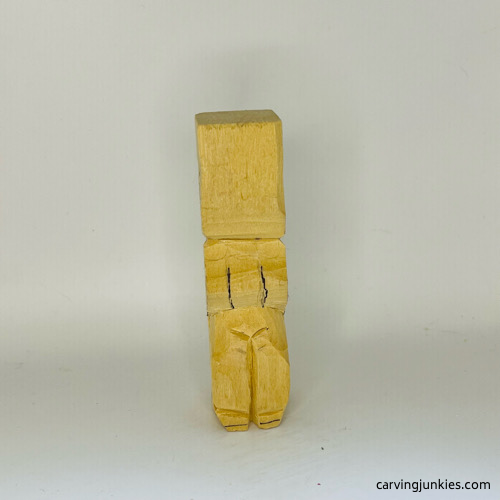 20. The tush line is carved
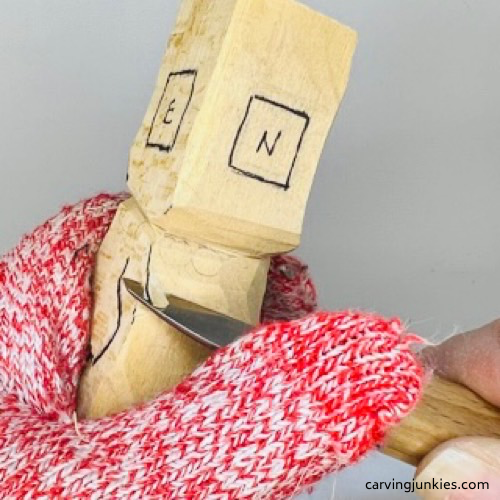 21. Narrowing the front shoulders
Refine the arms on the clown carving
Cut into the top of the shoulders toward the neck on each side (photo 22). Also, separate the inside of the arm on each side (should look like photos 24,25). You can use pyramid cuts to separate the insides of the arms.
Taper the arms at the bottom until it looks like the hands are inside the clown‘s pockets (photos 23,24,25). Add some wrinkles on the arms.
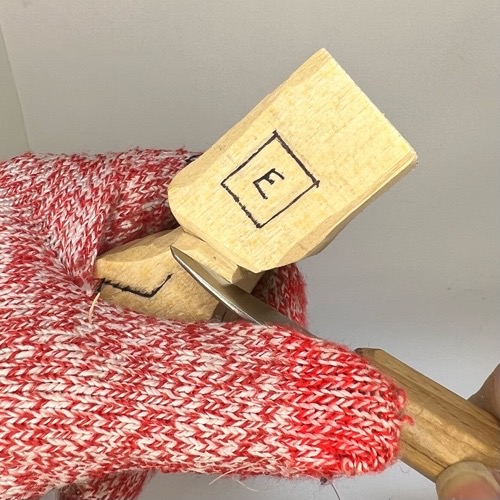 22. Cutting the shoulders
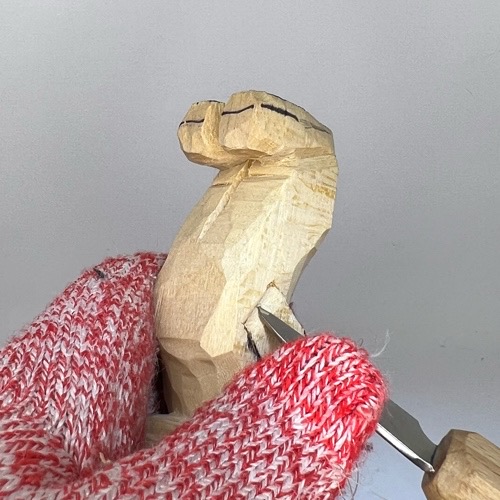 23. Tapering the hand in the pocket
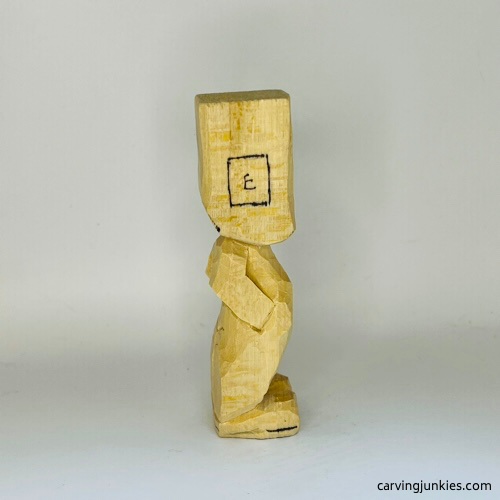 24. Right view of separated arm
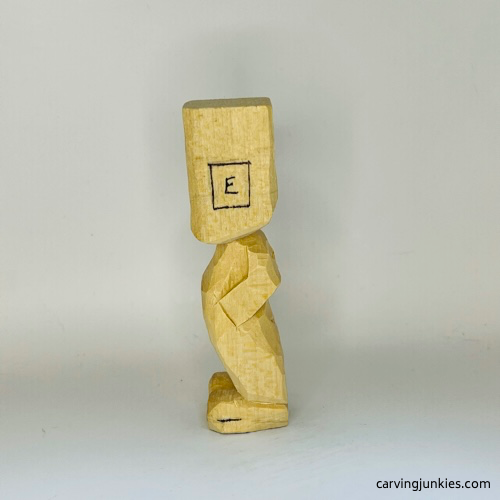 25. Left view of separated arm
Start the face of the clown carving
Separate the nose box on the face (this may take several passes to get the desired depth) and mark where you will remove wood to round the nose (photo 26).
Once the nose is refined, shape the face into an oval (photos 27-29). The clown will have a bald head and you will glue on his hair later with dyed cotton batting (you could also use cotton balls).
You may need to redraw the ear boxes after you shape the head (redrawn a little smaller in photos 28,29).
Also, draw on the facial details, pant waist, suspenders, and the little ascot that will go around the clown’s neck (photos 27-28).
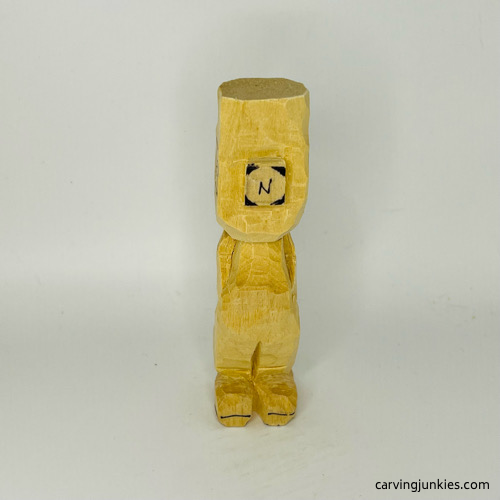 26. Mark nose for shaping
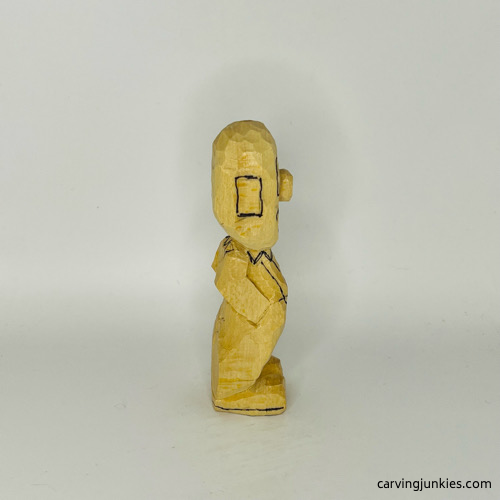 28. Right view
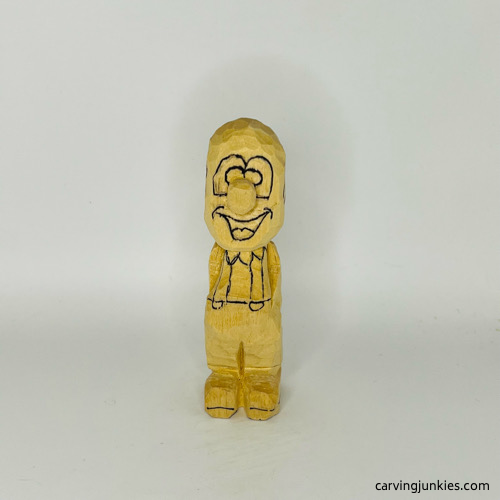 27. Nose is shaped and details are drawn
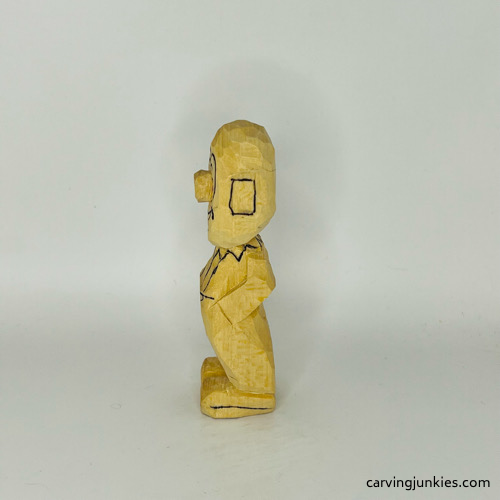 29. Left view
Carve the details on your clown carving
Round the ears with your knife. Also carve the middle of the ear (photos 31, 32). You can make a slicing cut at an angle on each side to remove wood.
Separate all the guidelines on the face (should look like photo 30). Make a slicing cut, and then another slicing cut at an angle just below the first cut, to remove the wood. Work this way around all the guidelines.
After you separate the tongue, make a little V-cut in the middle (photo 30).
For the outer eye sockets, you may want to use stop cuts, removing wood around them (photo 30).
Use stop cuts to carve the the suspenders, shirt, and the ascot around the neck (photos 30-33). Use small V-cuts to create the indentation on the suspenders (photo 30). Note: use small V-cuts to add a few more wrinkles to the shirt and front of the pants (we forgot them!).
Finally, use stop cuts to carefully separate the rims on the shoes (photos 30-33).
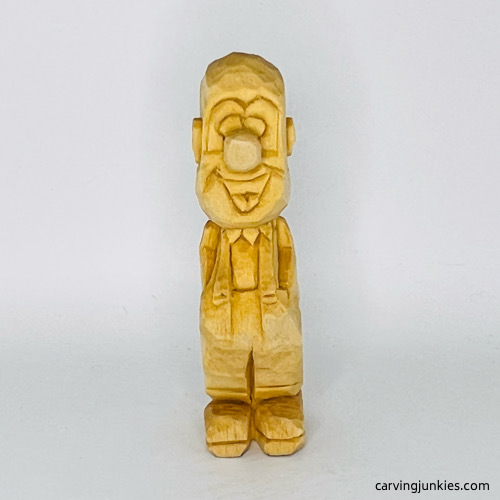 30. Front of clown before painting
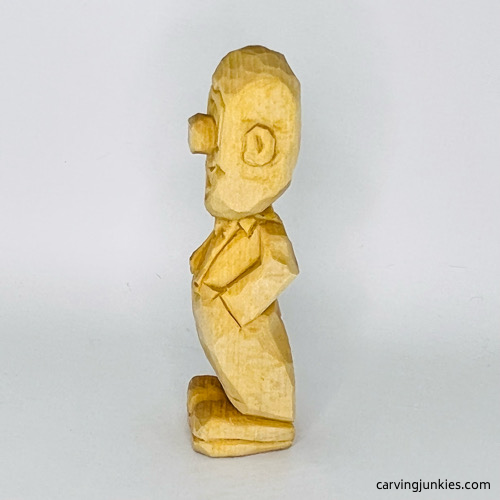 32. Left view of clown before painting
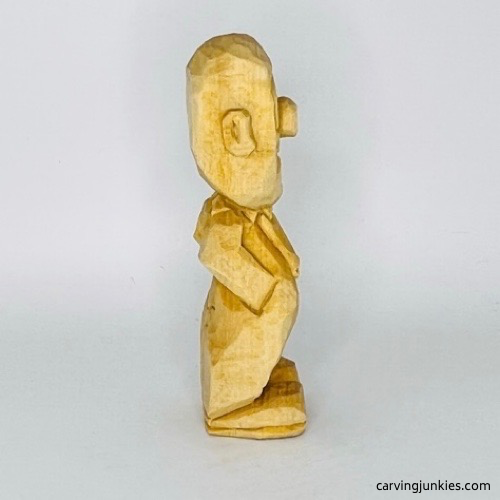 31. Right view of clown before painting
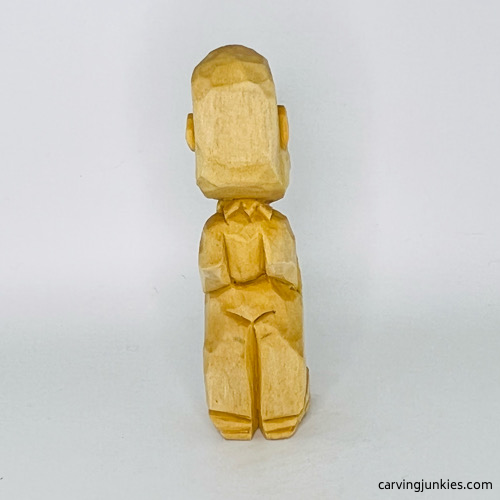 33. Back view of clown before painting
Put some paint on your clown carving
Use whatever paint and paint brushes you prefer (we use acrylic and water the colors down, unless they are marked below as 100%). Toothpicks come in handy for tight corners and small details (whites of eyes, polka dots).
We also dyed some cotton batting with red food dye for the hair and glued it on after painting (photos 34-37). Allow the hair to dry thoroughly before you glue it on to the clown carving. You can gently fluff it into shape with your fingers.
Here are the colors/brands used to paint the clown carving:
- Face and ascot: 100% Artist‘s Loft titanium white.
- Head: 100% Ceramcoat tawny light wash.
- Nose, tongue, and shoes: Ceramcoat bright red. For suspenders 100% paint.
- Shirt: FolkArt apple orchard wash.
- Pants: Ceramcoat bright yellow wash.
- Eyes: 100% Delta black. Whites: 100% titanium white.
- Face lines and eyebrows: Black magic marker.
- Shading for ears and head: Dry bush with Apple Barrel classic caramel.
- Dry brush with titanium white on shoes, shirt, and suspenders.
- Finish with Howard’s Feed and Wax.
- Seal with Minwax Polyacrylic to protect the hair color (optional).
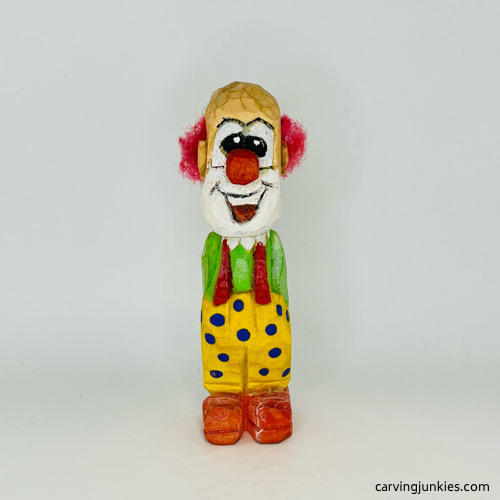 34. Front view of painted clown carving
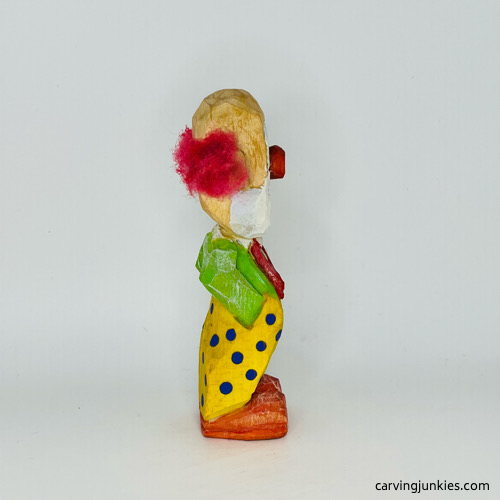 35. Right view of painted clown carving
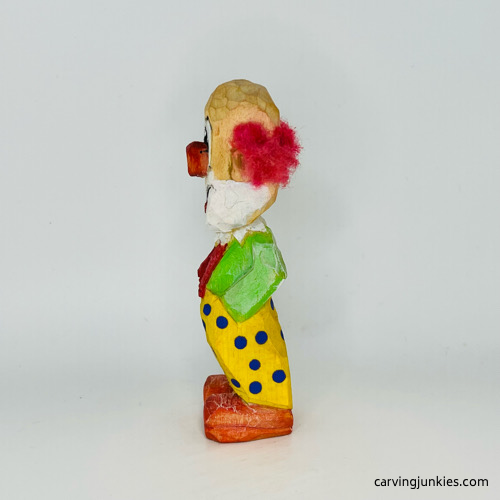 36. Left view of painted clown carving
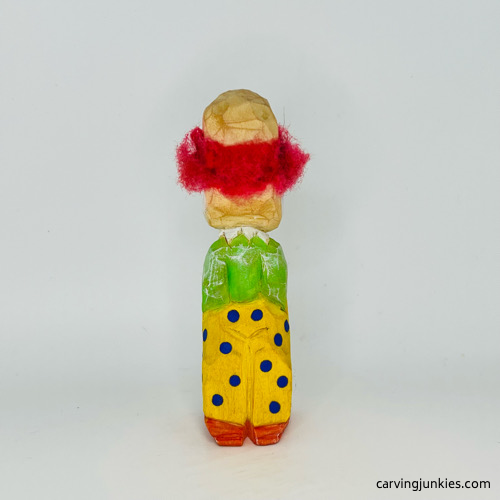 37. Back view of painted clown carving
Free clown carving template
Photocopy the template to size to fit your wood block.
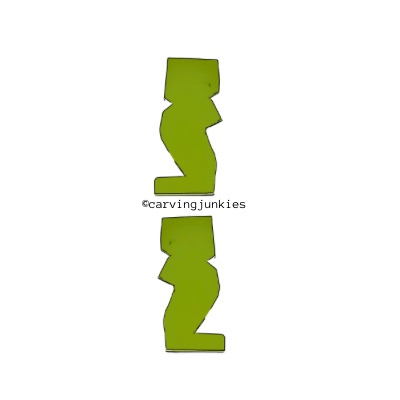
Free clown carving pattern
If you prefer to carve your clown with a pattern, photocopy this to size to fit your wood block.
Clown carving tutorial summary
- Our little clown carving is bright, colorful, and full of whimsy.
- The template for this tutorial makes it easy to carve the body at an interesting angle.
- Adding the colored hair (dyed cotton batting) is a fun way to make your clown carving come alive.
- You can use other color combinations for the pants, polka dots, and hair.
Get 50 Wood Carving & Painting Tips
FREE when you join our free Covered in Chips Club
Your information is 100% private and is never shared. Unsubscribe anytime. See our Privacy Policy .
Share page on:
Home | Privacy Policy | Terms of Use | Contact | Sitemap
